> ## Documentation Index
> Fetch the complete documentation index at: https://help.wonka.chat/llms.txt
> Use this file to discover all available pages before exploring further.
# Quick Start Guide
> Get started with WonkaChat in 5 minutes, from first login to your first AI-powered workflow.
Get up and running with WonkaChat quickly and start experiencing AI-powered automation across your business tools.
## Your 5-Minute Success Path
Access WonkaChat through one of four methods:
If you received an invitation to join your organization's WonkaChat:
1. Check your email for the WonkaChat invitation
2. Click the invitation link
3. Create your account using the provided setup flow
4. Complete your profile
5. Start using WonkaChat with your team's configuration
If your organization already has WonkaChat set up, use your work credentials:
**Sign in with:**
* **Google Workspace** (your company Google account)
* **Microsoft 365** (your company Microsoft account)
* **Other SSO providers** your organization configured
No new password needed, just use your existing work account to access WonkaChat instantly.
Create your personal WonkaChat account and subscribe directly:
1. Visit [wonka.chat/register](https://wonka.chat/register)
2. Enter your email address and create a password
3. Accept the Terms and Conditions
4. Click **Continue** to create your account
5. Complete payment to activate your account
Your subscription is managed through Stripe with secure payment processing.
If you're setting up WonkaChat for your entire organization:
1. Contact our team through the [Getting Help](/support-resources/getting-help) page
2. Discuss your organization's requirements and user count
3. Receive your custom enterprise invitation
4. Configure SSO, governance policies, and team settings
5. Invite your team members with pre-configured access
Enterprise plans include dedicated support, custom integrations, advanced security features, and volume pricing.
**What you'll see after login:**
* Clean chat interface in the center
* Connected tools and AI Agents in the sidebar
* Model selection options in the settings
* Your prompt library and saved conversations
**Watch the WonkaChat Dashboard Walkthrough**
In this video, you'll learn how to navigate the WonkaChat interface, access essential features, and customize your workspace for maximum productivity.
Let's make sure everything works with a simple test:
### Send a Basic Message
Type something simple in the chat:
```
Can you say "Hello World" please?
```
WonkaChat will respond, confirming the platform is working correctly.
If you receive a response, you're all set! The AI is connected and ready to help.
Now let's connect WonkaChat to your email account so it can access your emails and calendar.
This example uses **Outlook Mail**, but the process is identical for **Gmail**, or any other email system. Simply click the corresponding the right connection button for your email provider and follow the same steps.
### Step-by-Step Connection
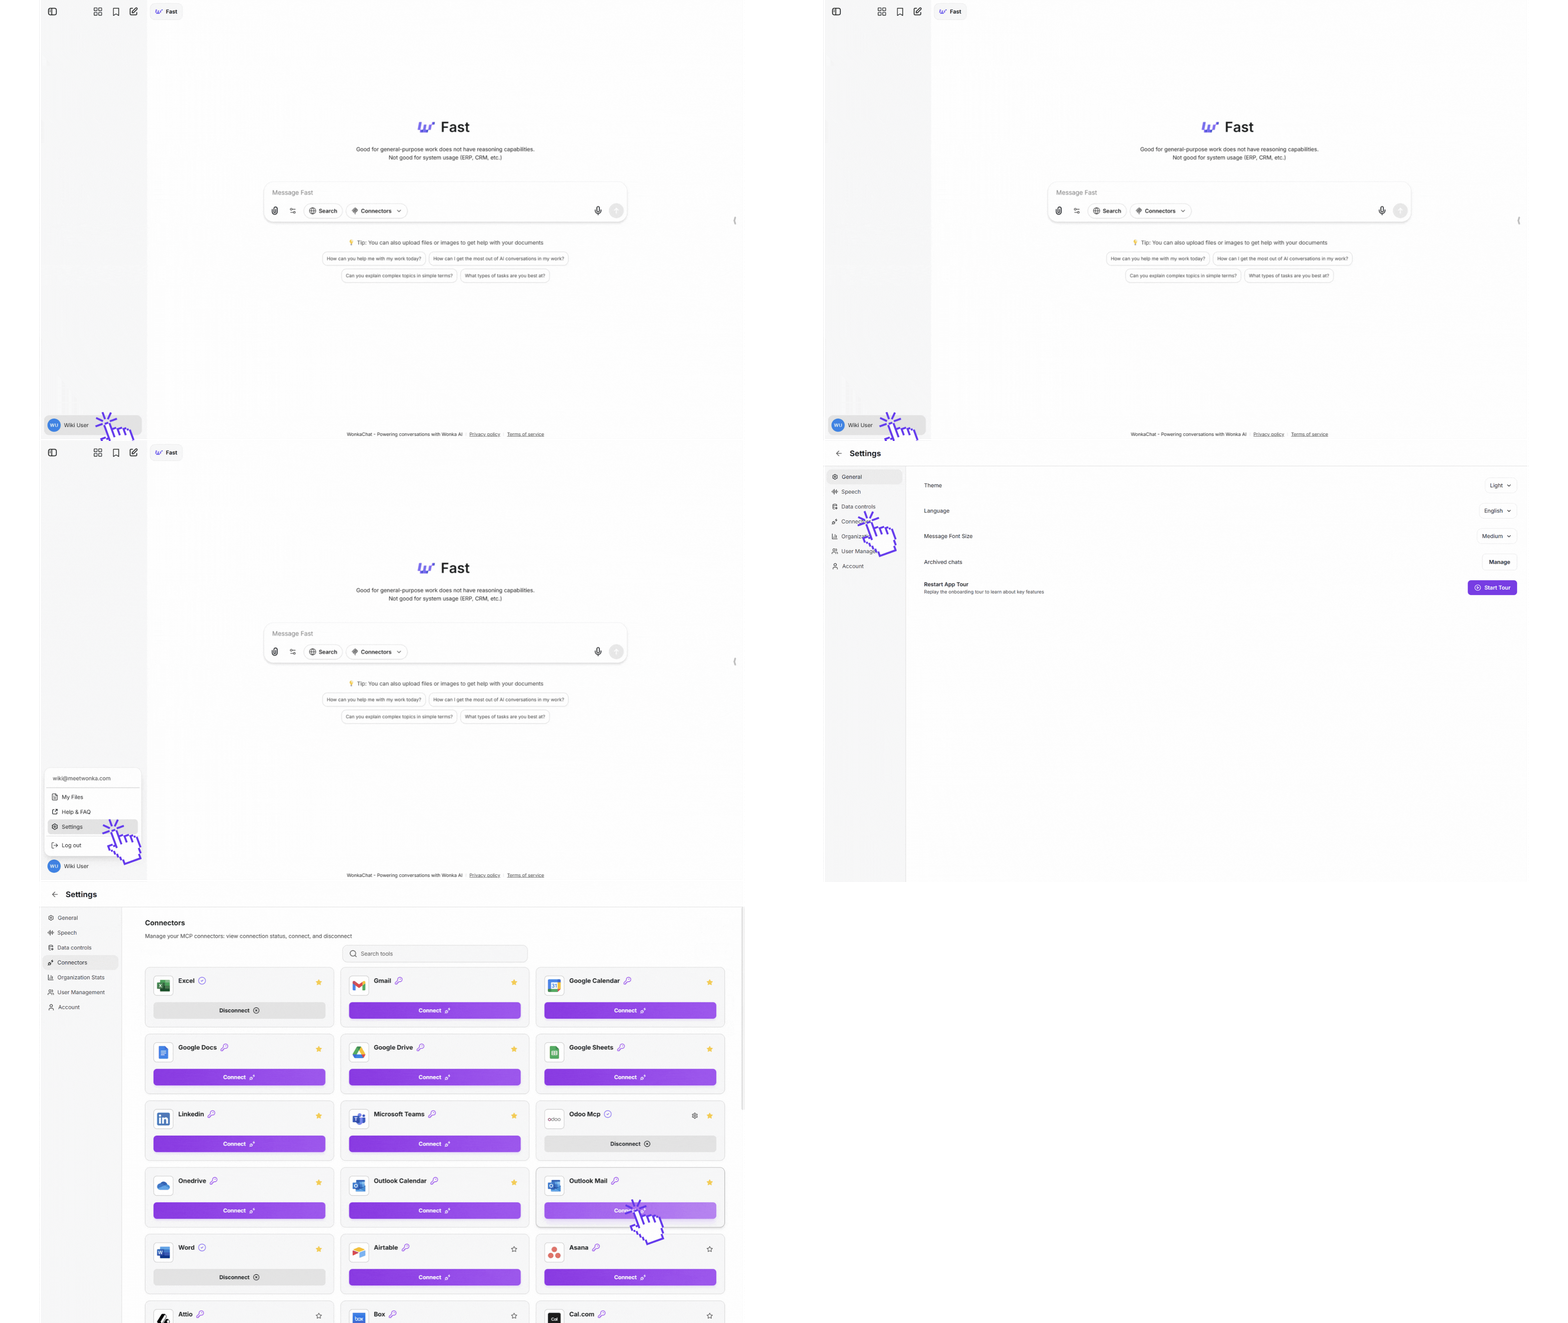
On the bottom left of your WonkaChat interface, locate the settings and open the **Connectors** button.
Learn about external connections in [Tools & Connection](/tools-connection/introduction).
A connection window will appear asking for your credentials. Enter the required information:
* Your Outlook email address
* Authentication credentials (this will use your organization's authentication method)
WonkaChat uses secure authentication and never stores your password. All credentials are encrypted.
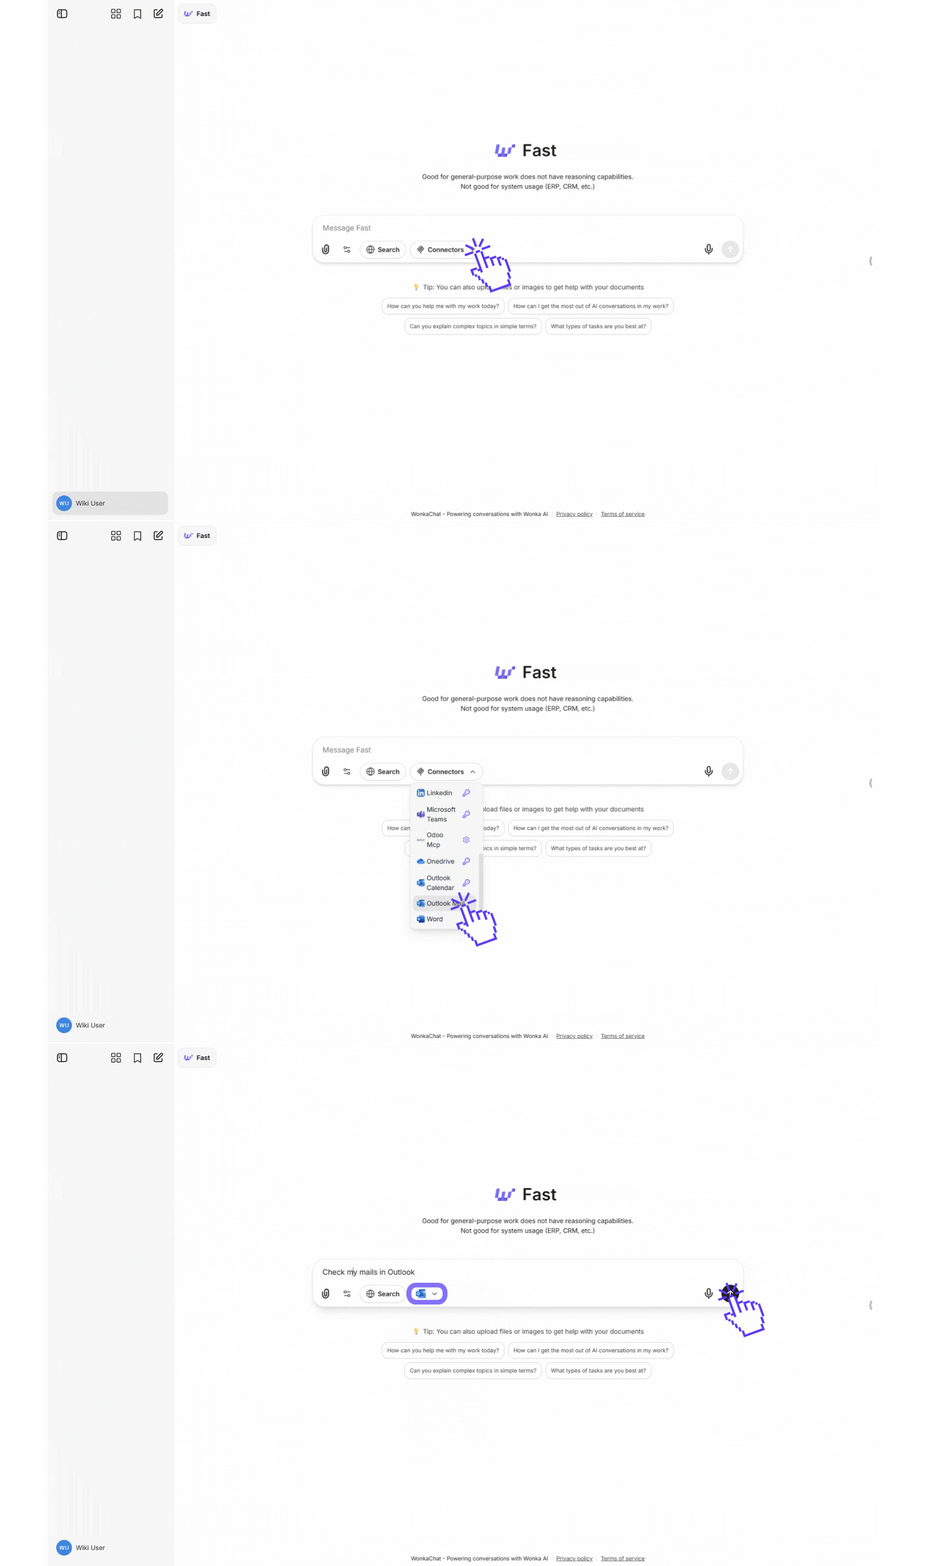
After connecting, you need to authorize the external connection for the AI model you're using.
Click **"Connectors"** and select which connection you want the AI model to use.
Once the Outlook Mail connection is enabled, the AI can read your emails, access your calendar, send messages on your behalf, and handle any Outlook-related tasks through natural conversation.
Now that Outlook Mail is connected, let's use it in a conversation:
### Send a message to the connected AI model
Type something like:
```
Send an email to Sarah letting her know I'll be 5 minutes late to the meeting.
```
The AI will only interact with Outlook or send messages when you explicitly request it. It always follows your permissions and never takes action without your direction.
WonkaChat will:
* Access your Outlook account through the configured connection
* Draft an email to Sarah with your update
* Send directly the mail or present it for review before sending (depends on your prompt and on the model used)
You've successfully connected a tool and used it through natural conversation!
Choose the right model for your task:
**Use for complex tasks:**
* Strategic analysis
* Multi-step problem solving
* Data analysis and insights
* Complex workflow planning
* External tool connections
**Example:** "Analyze our Q3 sales data and recommend improvements"
**Use for quick tasks:**
* Simple questions
* Fast information retrieval
* Basic formatting
* Quick summaries
* High-volume operations
**Example:** "What's my next meeting?"
When in doubt, start with pro models for important tasks. You can always switch to fast models for speed and cost once you understand the query complexity.
The more context you provide, the better WonkaChat can help. Include relevant details, timeframes, and desired outcomes.
Begin with straightforward queries and gradually work up to complex multi-step workflows as you learn the platform.
***
## Next Steps: Go Deeper
Now that you're familiar with the basics, explore more advanced capabilities:
Build specialized agents focused on specific tasks for more accurate, reliable results with reduced hallucinations.
Learn how external connections (MCP) work and scale from connecting a single tool to integrating your entire business ecosystem.
Discover techniques for asking better questions, managing conversations effectively, and getting more value from every AI interaction.
Learn how to use AI securely, maintain data privacy, and implement governance policies that protect your organization while maximizing AI capabilities.
 Click **"Connectors"** and select which connection you want the AI model to use.