> ## Documentation Index
> Fetch the complete documentation index at: https://help.wonka.chat/llms.txt
> Use this file to discover all available pages before exploring further.
# Access Control
> Manage user roles, user access, agent permissions, and tool restrictions to control what AI agents can do in your organization.
Control who has access to what in your WonkaChat organization. Manage users, assign roles, define granular permissions for AI agents, and restrict which tools agents can use to ensure secure collaboration.
Access control implements the principle of least privilege that allows users and agents to receive only the permissions they need to do their work.
***
## User Management
Add, manage, and remove users in your organization through the Settings panel.
Click your name in the bottom left corner of the WonkaChat dashboard, then select **User Management**. Only administrators can access user management functions.
Send email invitations to users you want to add to your organization. Users receive an invitation link to create their account and join.
Choose whether the new user will be an **Admin** or a **User** when sending the invitation.
You can change user roles at any time after they join the organization.
Promote users to administrators or remove admin privileges as responsibilities change.
Administrators can manage their own admin rights, but cannot override or remove admin privileges from other administrators.
Permanently remove users from your organization. While you can easily delete and re-add users, all data associated with the account is permanently deleted and cannot be recovered.
Removing a user deletes all their data irreversibly. You can re-add the user later, but their previous agents, configurations, and settings will be gone forever. Consider deactivation for temporary access removal.
***
## Role-Based Permissions
WonkaChat uses a simple two-role system for clear permission boundaries.
### Available Roles
**Personal agent creation**
• Create their own personal AI agents\
• Use agents shared by administrators\
• Modify shared agents only if granted permission\
• Access only the personal created agents or admin shared agents
Users cannot share agents with others, only administrators can make agents available organization-wide.
**Full organizational control**
• Manage all users\
• Create, modify, and share agents organization-wide\
• Control agent permissions (who can view/modify)\
• Promote users to administrator roles
Admins have complete control except they cannot override other administrators' privileges.
Keep the number of administrators limited to those who need full organizational control. Most team members should have User roles.
### Agent Visibility Scope
Agents created by users are **private by default** and visible only to the creator.
Users cannot share their personal agents organization-wide. Only administrators can share agents.
If a user creates a valuable agent and wants to share it, they should contact an administrator to review and share it.
Agents shared by administrators can be made available to:
* **Specific users**: Select individuals who can access the agent
* **Entire organization**: All users in the organization
Admins control the exact permission level (Viewer, Editor, or Owner) for each shared agent.
Shared agents appear in users' agent lists based on the permissions they've been granted.
***
## Sharing AI Agents
Administrators can share AI Agents directly from the Agent Builder panel.
As an administrator, you control agent sharing from the Agent Builder panel.
### How to Share an Agent
Navigate to the agent you want to share (or create a new one) in the Agent Builder.
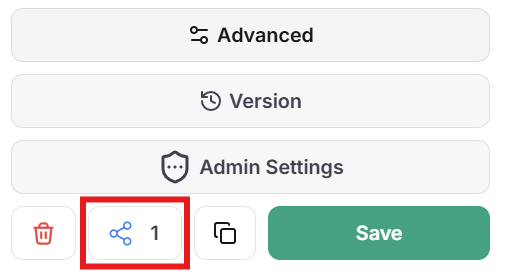
In the Agent Builder panel, you'll find sharing options:
**Visibility:**
* Share with the entire organization, or
* Share with specific users
**Permission Levels:**
* **Viewer**: Can view and use the agent (no modifications)
* **Editor**: Can view, use, and modify the agent
* **Owner**: Has full control including sharing and deletion
For important organizational agents, use Viewer permissions for most users and grant Editor access only to trusted collaborators.
Before sharing, verify which tools and MCP connections the agent has access to. Ensure they're appropriate for all users who will have access.
When users interact with a shared agent, the agent inherits that user's permissions in connected tools. Consider what data different users can access.
Save your sharing configuration. The agent immediately becomes available to the specified users based on the permissions you set.
Users will see the shared agent in their agent list and can start using it according to their granted permissions.
As a standard user, you can create personal agents but need administrator involvement to share them organization-wide.\
If you create an agent that would benefit others, contact an administrator to request organization-wide sharing.
Provide:
* Clear description of what the agent does
* Intended use cases
* Why it would benefit the organization
* Which tools it requires
Administrators need to review agents for security, tool access, and compliance before sharing them widely.
### Using Shared Agents
When an administrator shares an agent, they can assign one of three permission levels:
**Can view and use the agent but cannot modify it**
Viewers can:
* Use the agent in conversations
* See the agent in their agent list
* Access the agent's capabilities
Viewers cannot:
* Modify the agent's configuration, prompts, or tools
* Share the agent with others
* Change agent settings
Viewer permission is ideal for most users who need to use the agent without making changes.
**Can view and modify the agent**
Editors can:
* Use the agent in conversations
* View the agent's configuration and settings
* Modify the agent's prompts, tools, and configuration
* Make changes that affect all users
Editors cannot:
* Share the agent with others
* Change ownership or delete the agent
Granting editor permission allows users to change agent behavior for everyone. Use this carefully for collaborative agent development.
**Has full control over the agent including sharing it**
Owners can:
* Use the agent in conversations
* View and modify all agent settings
* Share the agent with others (assign Viewer/Editor/Owner permissions)
* Change or transfer ownership
* Delete the agent
Only administrators can be assigned as owners when sharing agents organization-wide. The agent creator is automatically the original owner.
***
## Tool Restriction
When creating an AI agent, you can control exactly which tools it has access to. This ensures agents only have the capabilities they need to perform their intended function.
### How Tool Restriction Works
When you add an MCP connection (like Outlook, GitHub, or Slack) to an agent, you can selectively enable or disable individual tools within that connection.
**For example**, if you add the Outlook MCP connection to an agent:
* You can **keep** tools like "draft email" and "read emails"
* You can **remove** tools like "send email" and "delete email"
Removing the "send email" tool means the agent cannot send emails, even if instructed to, because the capability simply doesn't exist for that agent.
Tool restriction happens at the agent creation level. Each agent can have different tool access based on its intended purpose.
### Why Restrict Tools?
By removing tools that perform irreversible actions (sending emails, deleting files, deploying code), you eliminate the risk of agents making mistakes or misinterpreting prompts.
**Security through absence**: If an agent doesn't have the "send email" tool, it's impossible for it to send an email (even by accident).
The fewer tools an agent has, the less can go wrong. Reduce the attack surface by giving agents only the specific capabilities they need.
**Example**: A data analysis agent doesn't need tools to modify or delete data. He should only receive read access.
Create specialized agents optimized for specific tasks by giving them precise tool sets.
**Example**: A "Draft Email" agent with Outlook MCP but only drafting tools enabled. He should not receive any sending, deleting, or forwarding capabilities.
### Example: Email Draft Agent
The difference between a helpful drafting assistant and a potential security risk often comes down to a single tool.
When creating agents, disable tools that execute final actions unless the agent specifically needs them. Enable tools for preparation and analysis, but restrict tools that send, delete, deploy, or modify production systems.
The same agent, but with the `send-email` tool restricted.
**The Result:**
```
User prompt: "Draft an email to john@example.com about the Q4 report."
Agent response: "Here's a draft email for john@example.com about the Q4 report:
Subject: Q4 Report Update
Hi John,
[draft content]
Would you like me to revise anything?"
```
Without access to the `send-email` tool, the agent can only draft content. The user reviews it, makes changes if needed, and manually sends when ready.
**Safe**: User maintains full control over when and what gets sent. Agent provides value without risk.
An agent configured to help draft emails but with the `send-email` tool still enabled.
**The Problem:**
```
User prompt: "Draft an email to john@example.com about the Q4 report."
Agent response: "I've drafted and sent the following email to john@example.com..."
```
Because the agent had access to the `send-email` tool, it interpreted "draft an email" as permission to also send it. The email went out before the user could review it.
**Risk**: Unreviewed emails being sent, potential data leaks, unprofessional communication, or sending to wrong recipients.
***
## Safe Mode: Human-in-the-Loop
Safe Mode ensures you approve every action an AI Agent wants to take before it executes.
**Visual Guide Coming Soon**: We're creating a step-by-step visual guide with screenshots showing exactly how Safe Mode works, including the approval dialog and decision workflow.
### How Safe Mode Works
Enable Safe Mode for agents that perform high-risk operations:
* Send communications (emails, messages, posts)
* Modify or delete production data
* Deploy code or configurations
* Execute financial transactions
Safe Mode provides essential oversight to prevent mistakes and unauthorized actions in critical operations.
When an AI agent wants to use a tool or execute an action, it pauses and requests your approval.
You see exactly what the agent wants to do, which tool it wants to use, and what parameters it will pass.
Review the requested action and decide whether to:
* **Allow**: The action executes as requested
* **Deny**: The action is blocked, and the agent continues without executing it
This is your opportunity to catch potential mistakes, verify actions are appropriate, and maintain oversight.
* If approved, the action executes and the agent receives the results
* If denied, the agent is informed the action was not permitted and can adjust its approach
You can disable Safe Mode for trusted agents performing routine tasks, but it's recommended for agents with access to powerful tools.
***
## Access Control Advices
Grant admin roles only to those who need full organizational control. Fewer admins = easier auditing and reduced risk.
Begin with minimal tool access and permissions, then add only as needed. It's easier to grant access than to recover from mistakes.
Periodically audit who has access to which agents and tools, adjusting as roles and responsibilities change.
Always test new agents with Safe Mode enabled to observe what actions they attempt before granting autonomous operation.
Clear communication about agent purposes, permissions, and tool restrictions helps users understand what they can do and reduces support requests.
 **Visibility:**
* Share with the entire organization, or
* Share with specific users
**Permission Levels:**
* **Viewer**: Can view and use the agent (no modifications)
* **Editor**: Can view, use, and modify the agent
* **Owner**: Has full control including sharing and deletion
**Visibility:**
* Share with the entire organization, or
* Share with specific users
**Permission Levels:**
* **Viewer**: Can view and use the agent (no modifications)
* **Editor**: Can view, use, and modify the agent
* **Owner**: Has full control including sharing and deletion